-
A year with my Impreza
It's hard to believe that I bought my Subaru Impreza a year ago! My initial impressions of the car were pretty good. Now that I've put about 10,000 miles on it, I am convinced that I made the right choice with the car. We've taken it on a few road trips pushing, but mostly I've driven it around town.
I've never owned a "sports car" and this may be the closest I come to one. This car is truly fun to drive. I've been playing a lot with the paddle shifters especially going down mountains. Also, being closer to the ground, I definitely feel the acceleration.
Tech wise, CarPlay is now a requirement for every car I get. The interface is clean and Apple updates it periodically with new features, something car manufacturers are not known to do with the infotainment systems. Up-to-date maps and navigation alerts such as alternate routes and accidents are handy. My only problem with CarPlay is that I have to wait for the infotainment system to fully power up before I plug in my phone, otherwise CarPlay fails to start. However, I'm testing a theory that the Subaru STARLINK app crashes when I connect my phone to the car. The app is useless and I'm not sure why I left it on my phone until this week.
I was concerned about the smaller cargo capacity especially going on trips and camping, but those concerns have so far been unfounded. I've managed to cram everything in the car without having to use the roof box I bought. The gas mileage has been pretty good with some trips giving me close to 38 mpg. Unfortunately most of my driving is city driving and a hybrid would have done much better in those circumstances. If Subaru had a hybrid Impreza, I'd definitely be interested in that.
The car has had a few recalls which is expected on a new platform and I hope I get years of continued service out of it.
Overall this car was a very good purchase. It may not be for everyone; it is the right car for me!
-
Digitally Preparing for an Emergency
The recent fires in Southern California have me thinking about what would I do if I had to evacuate. I'd grab the family and the dog, but what else? While I have a collection of personal mementos such as product boxes from my career, I'd probably just take my Eagle Scout award which is sitting on a shelf in my office. What about all the documents in my file cabinet? They could be important in the future.
Eleven years ago, I started on a journey to scan everything and go "paperless". I've been pretty good at scanning in things that come into the house, but missed a number of documents over the years and never went back prior to eleven years ago. This week, I've gone through my entire file cabinet and used my Fujitsu ScanSnap iX500
to finish the task. I put all the documents into Paperless for easy organization. In addition to all the paper, I used the scanner to scan over 1000 photos! The scanner is a workhorse and scans in everything I throw at it. Some would have used a professional service for the photos to save time, but I just plugged away and used the ScanSnap at 600 dpi to scan in the photos.
Now that I have all my photos and documents in a digital form, the question about what I'd take in case of fire gets a little easier. I'd grab my MacBook Pro and my Akitio Thunder2 Quad
with 24 TB of storage. This drive has all my media as well as backups from all the computers in the house. Of course, I need to bring a Thunderbolt 2 to Thunderbolt 3 dongle and a cable!
Would I be devastated if something happened to my house and belongings? No doubt I would, but as long as my family is safe everything else is just "stuff" and by going digital with my documents, I have peace of mind that I at least have copies of important documents.
-
Setting up WAN Failover on a USG
For many years, I've been intrigued about routers that have cellular backup to maintain connectivity when the primary Internet does down. I've never pursued setting this up as my Internet connection has been quite reliable with downtime measured in hours over the last few years. The cost to set this up could never be justified for my home setup.
One of the features of the latest UniFi Controller is the ability to turn an unused Ethernet port on the USG to be a WAN failover. This is a great addition for a enterprise class router, but overkill for my needs.
About a year ago I purchased a HooToo Travel Router to experiment with setting up a VPN when I travel. I had some success with it, but ultimately gave up and have just been using it as a battery for other devices. I've been reading forums about the Mobley and saw that the Mobley could be tethered to a router and not just used as a hotspot. Now I had a mobile hotspot and a router that maybe I could put together to be a WAN failover.
The forums talking about the Mobley mentioned router firmware called ROOter that supports various routers and modems. There happened to be firmware for a router similar to my portable router, so I decided to give it a try. Worst case is that I'd brick the router and this exercise would be over.
After a bit of fiddling, I got everything working. The below steps detail what I did. There are a large number of steps, but they're pretty simple. There should be very few, if any, changes for different LTE modems.
- I grabbed firmware for the HooToo TripMate Nano router.
- I then flashed the firmware onto the router. This is going to vary based on the current firmware on the router.

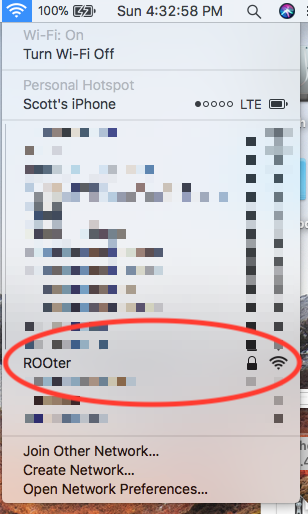
- Select the ROOter SSID on your computer. Use the default WiFi password of rooter2017.
- Goto Safari and enter 192.168.1.1.
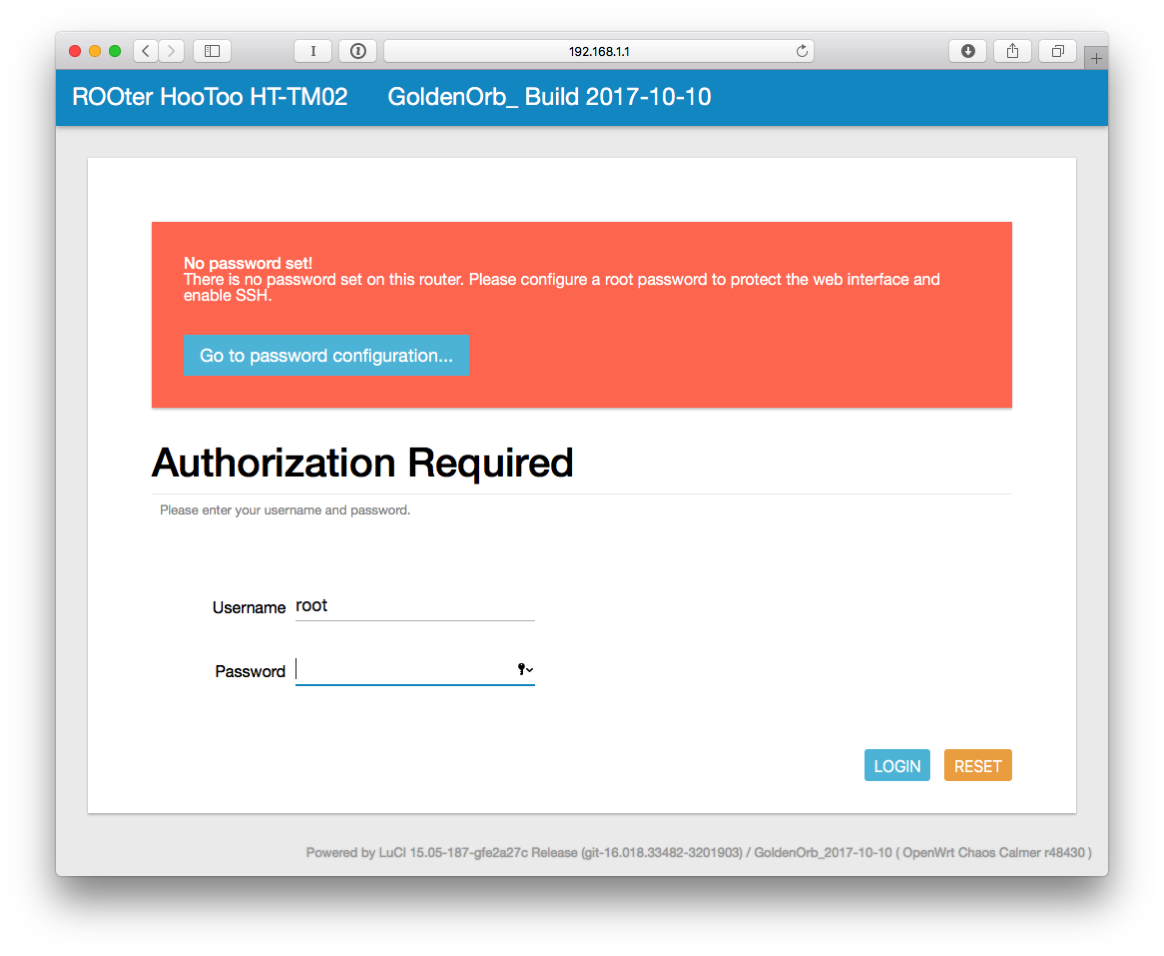
- Click Login.
- Click on "Go to password configuration..."
- Enter a password and confirm it.
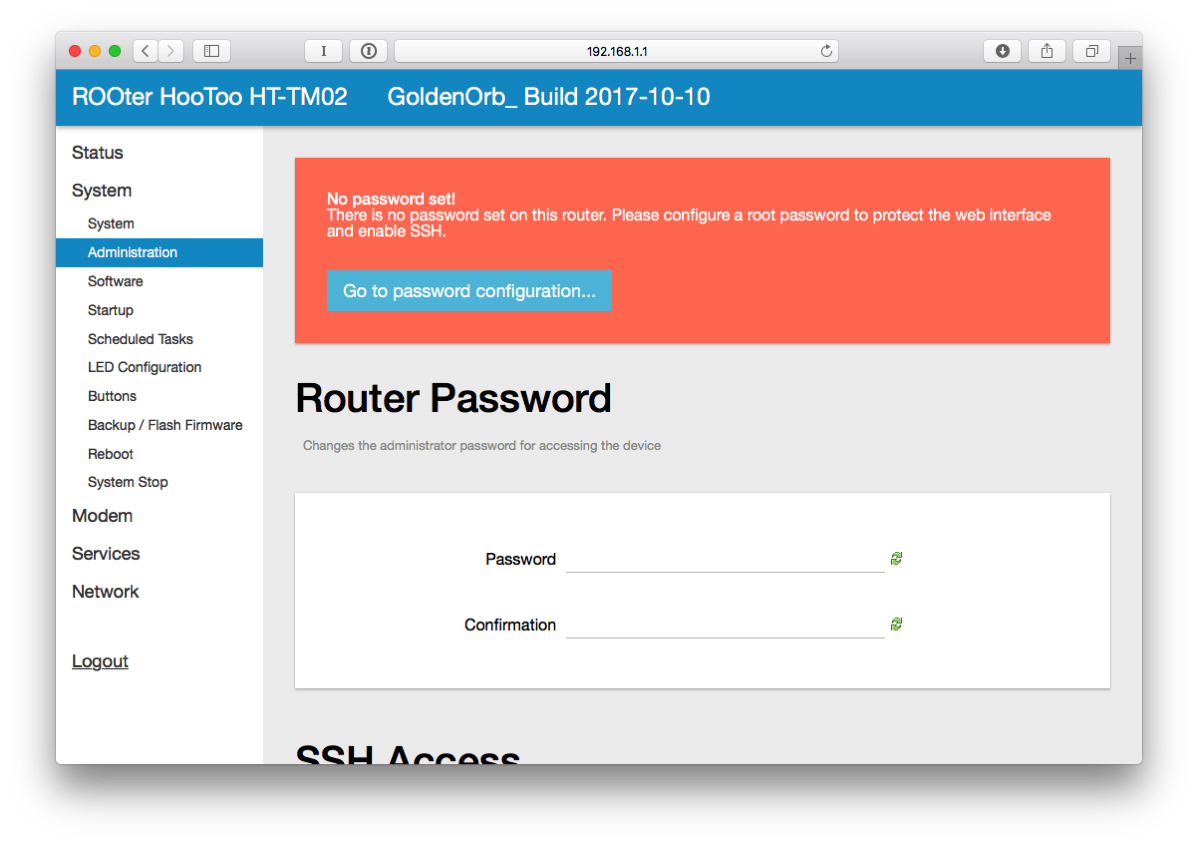
- Click SAVE & APPLY at the bottom of the page.
- On the left side, click on Network and then Interfaces.
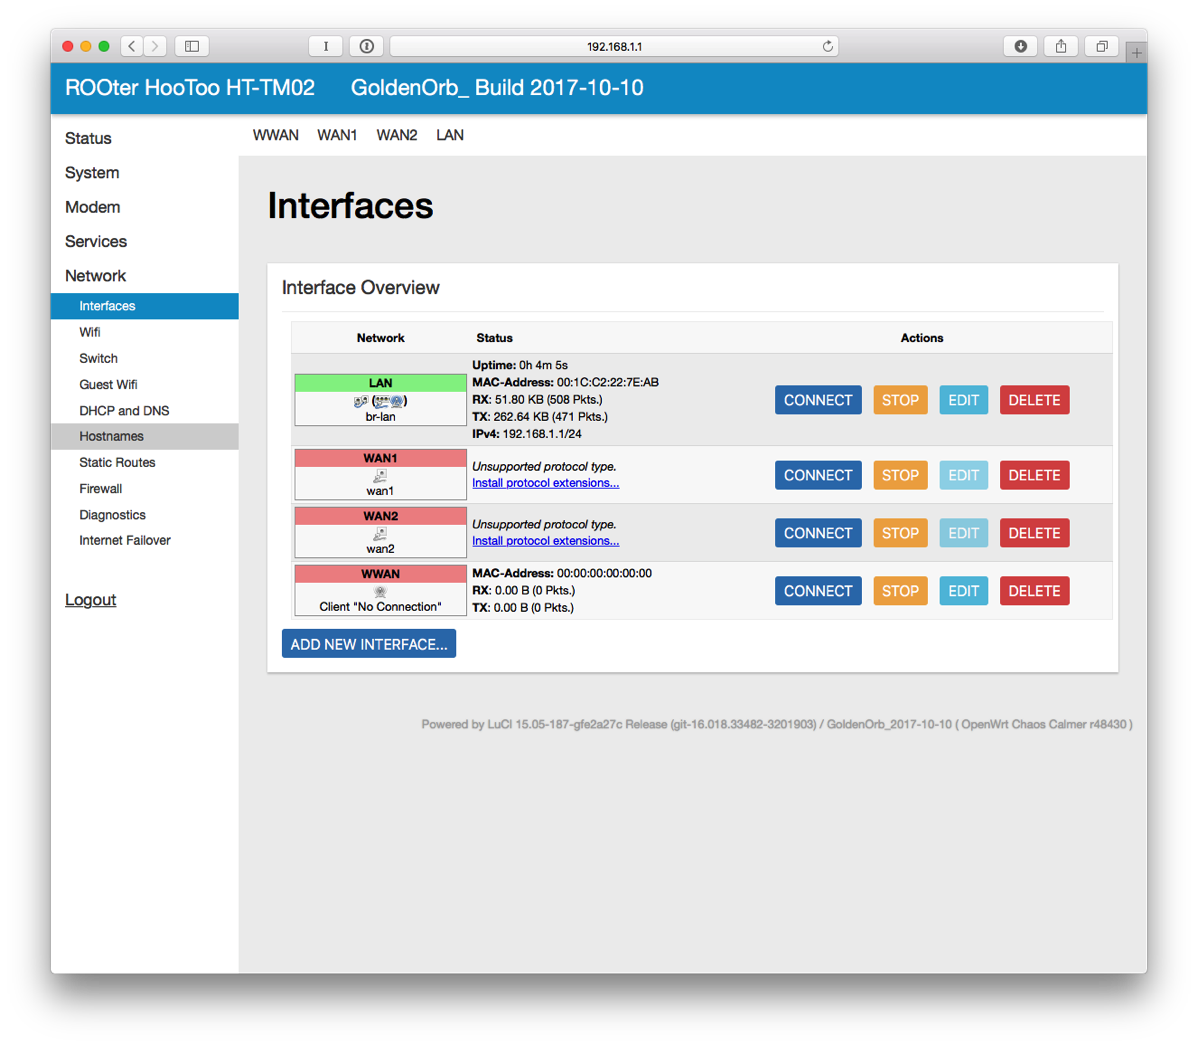
- Next to LAN, click on EDIT.
- For the IPv4 address, enter 10.10.10.1 (it has to be a different subnet than the hotspot and I like this numbering scheme). At the bottom of the page, click SAVE & APPLY.
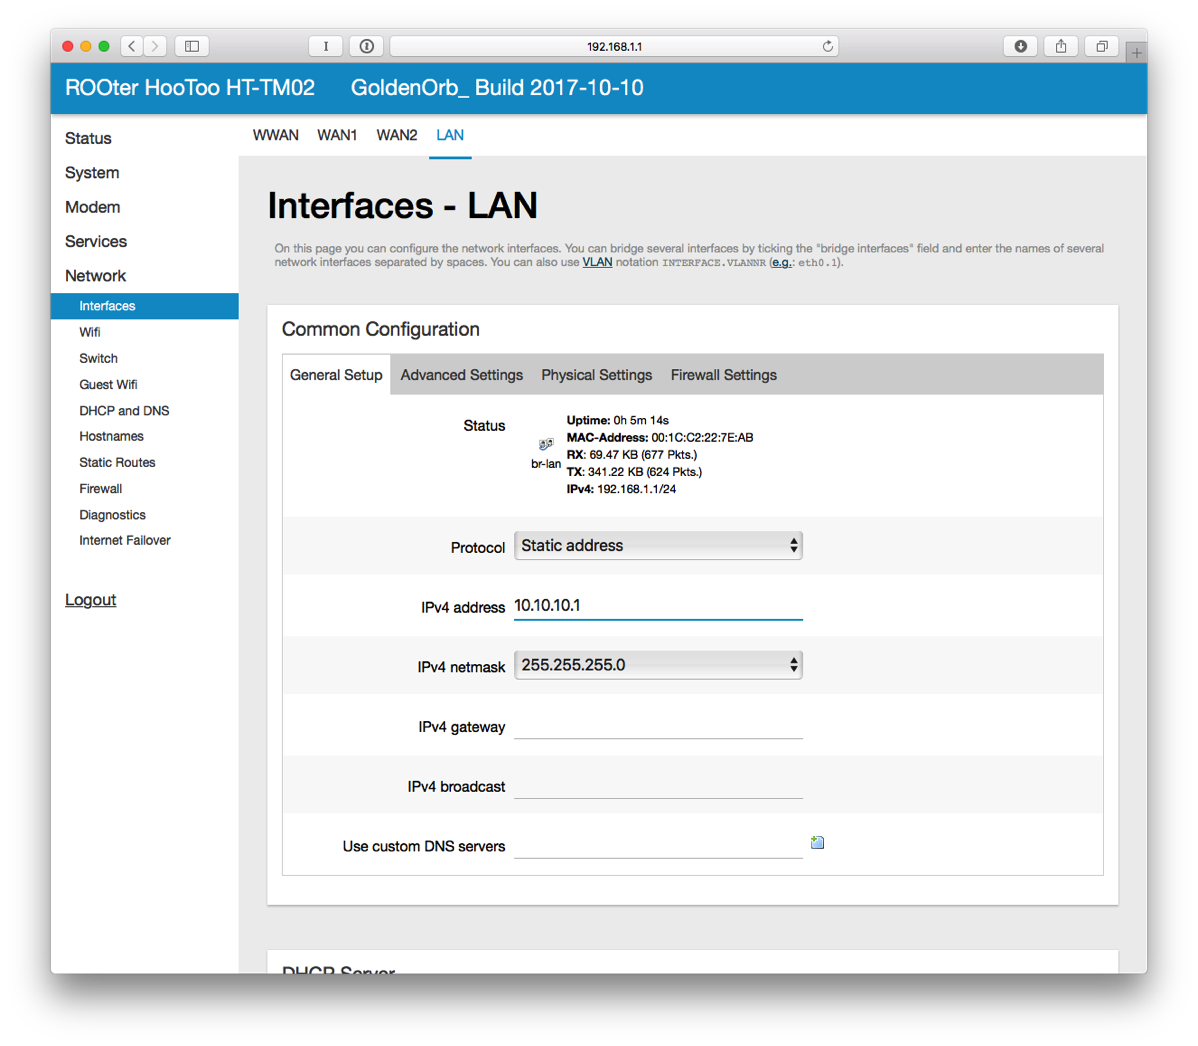
- The router will apply the settings and knock you off the network. I did have to disconnect from WiFi and reconnect to get assigned a new IP address.
- In Safari, connect to 10.10.10.1. Login.
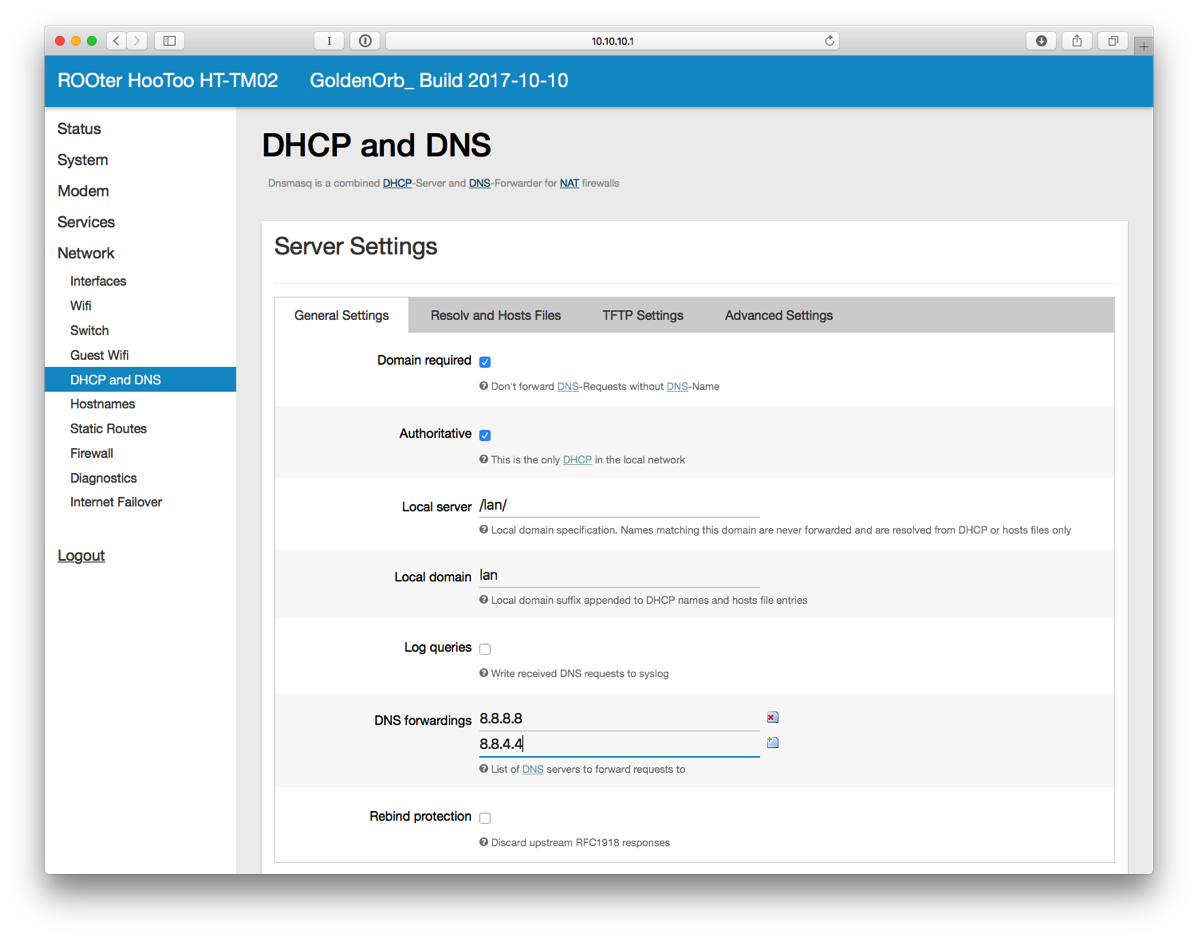
- On the left side, select DHCP and DNS.
- Enter 8.8.8.8 and 8.8.4.4 for DNS Forwardings. Click SAVE & APPLY at the bottom.
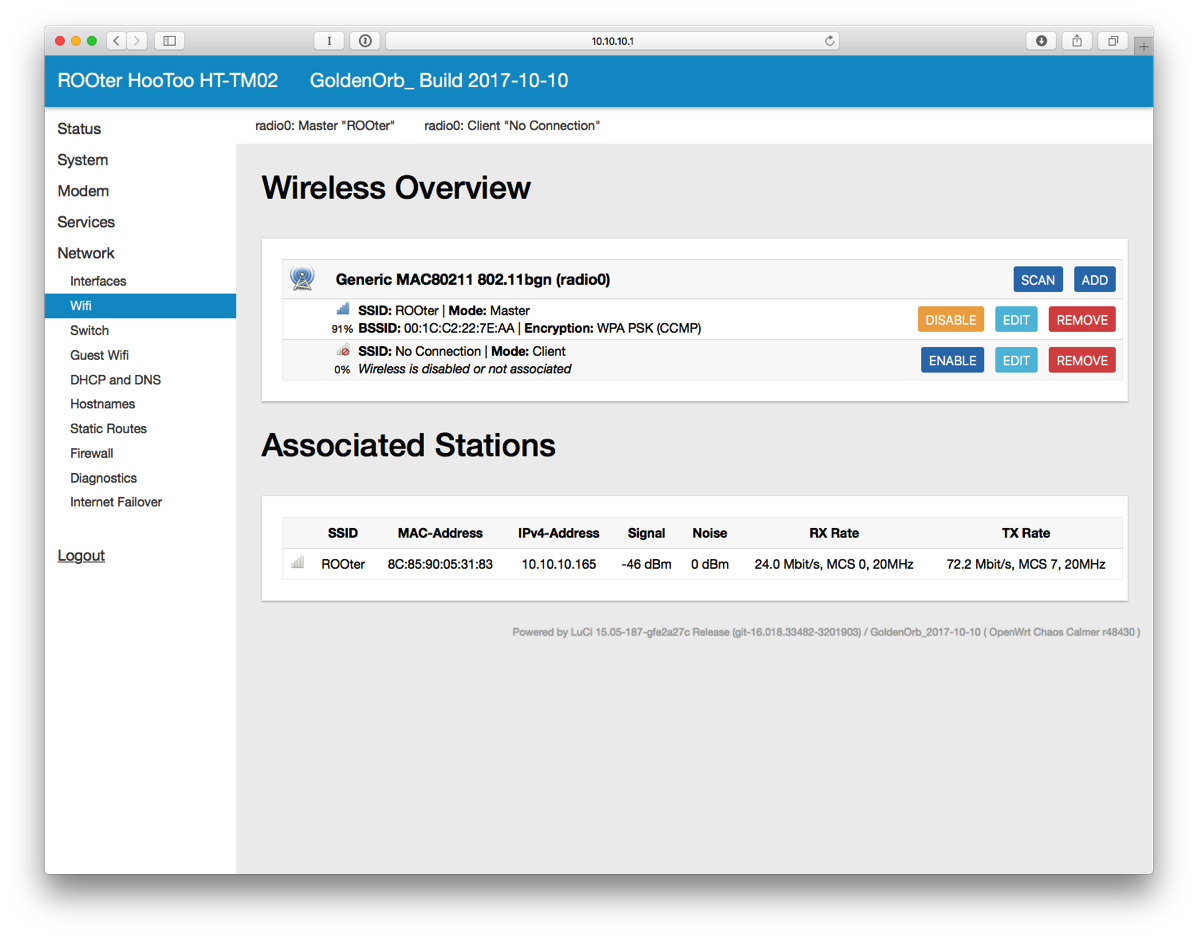
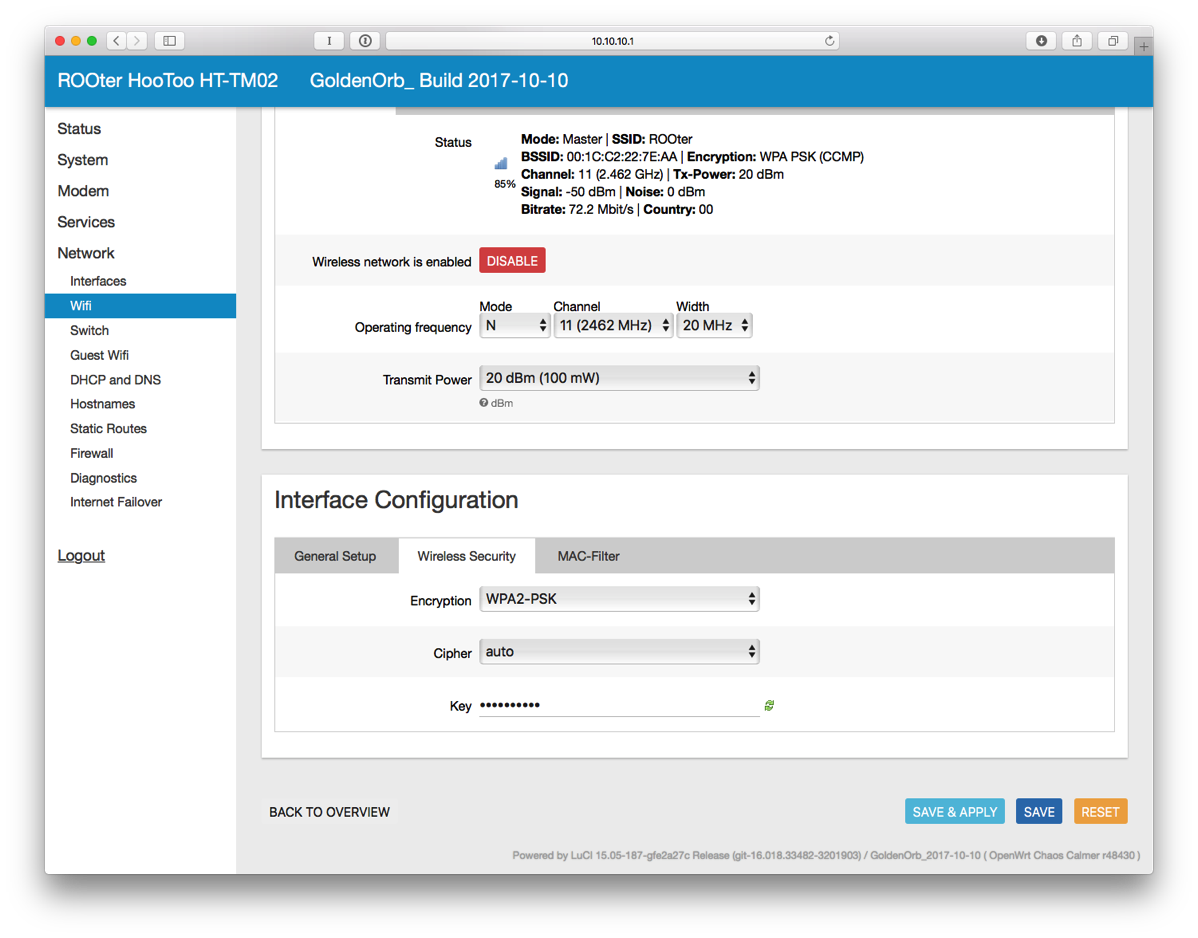
- On the left side, Select Wifi under Network and then click EDIT next to ROOter.
- Change the ESSID to whatever you want.
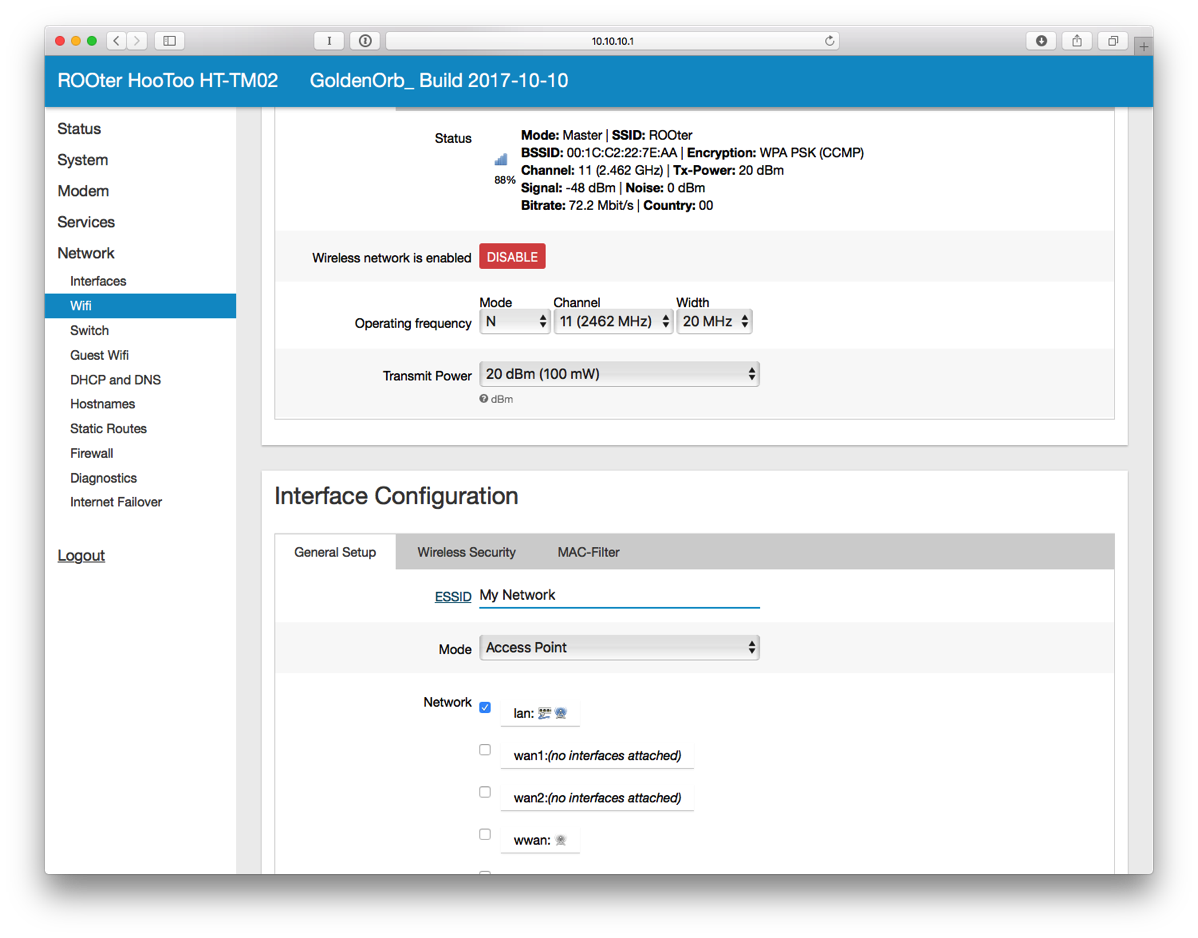
- Click on Wireless Security.
- Change Encryption to WPA2-PSK. Change the Key as well. Click SAVE & APPLY.
- You'll have to reconnect to WiFi for the new SSID that you just set.
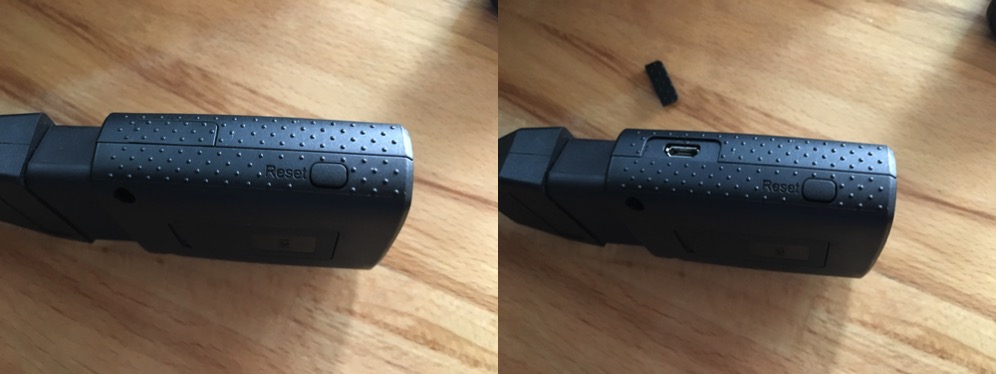
- Power on the Mobley. It can't be plugged into the USB port of the TripMate as there is a separate USB port on the Mobley for tethering.
- On the Mobley, peel off the little cover on one side to reveal a micro USB port.
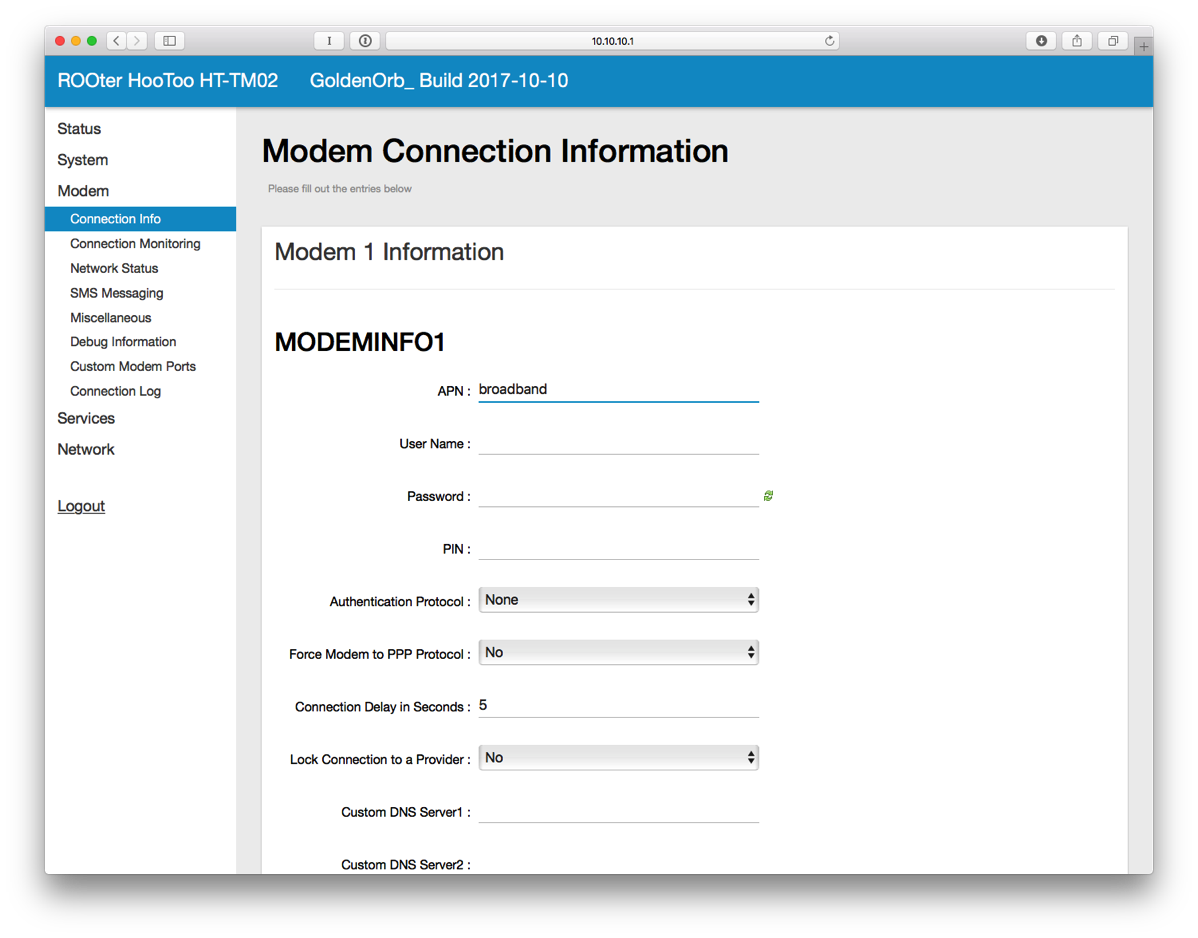
- On the left side of the interface, click on Modem and then Connection Info.
- Enter broadband next to APN and click SAVE.
- Plug in a micro USB cable from the router to the Mobley.
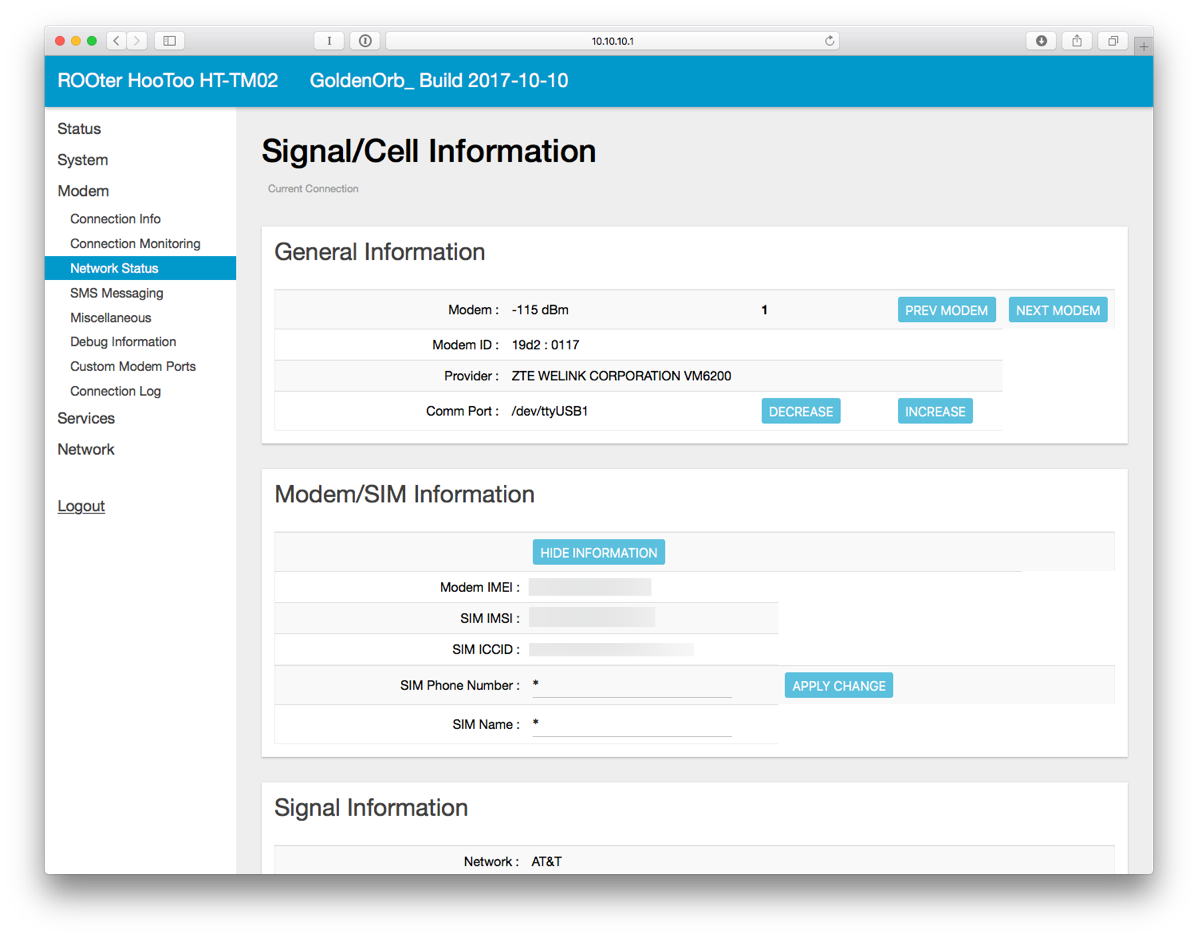
- On the left side, click on Network Status. Wait a little bit until the connection is established. Once connected, it will look like this.
- You may also want to setup Connection Monitoring which will attempt to reconnect the modem in case of network failure.
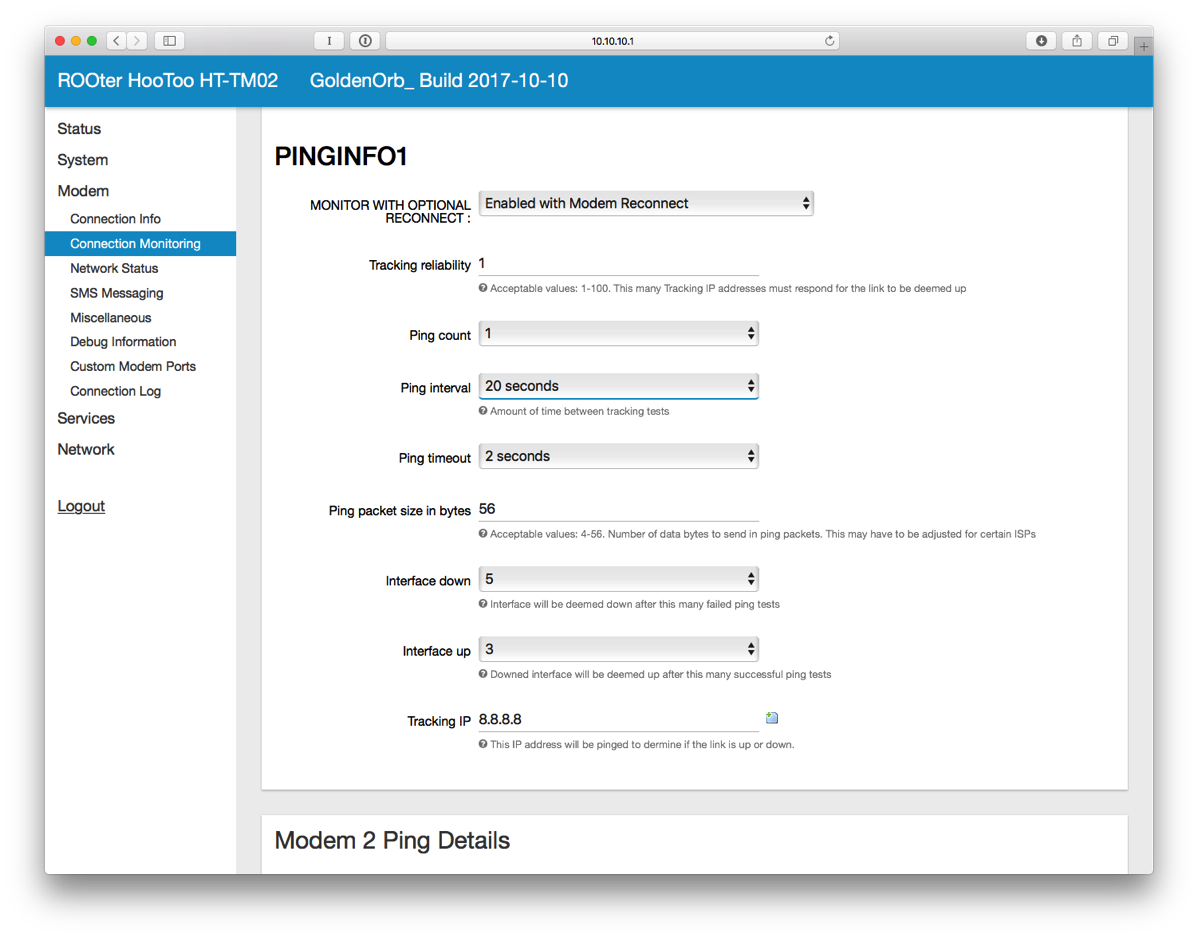
- Plug in an Ethernet cable from the router to the VOIP port (or LAN2 depending on the model) of the USG.
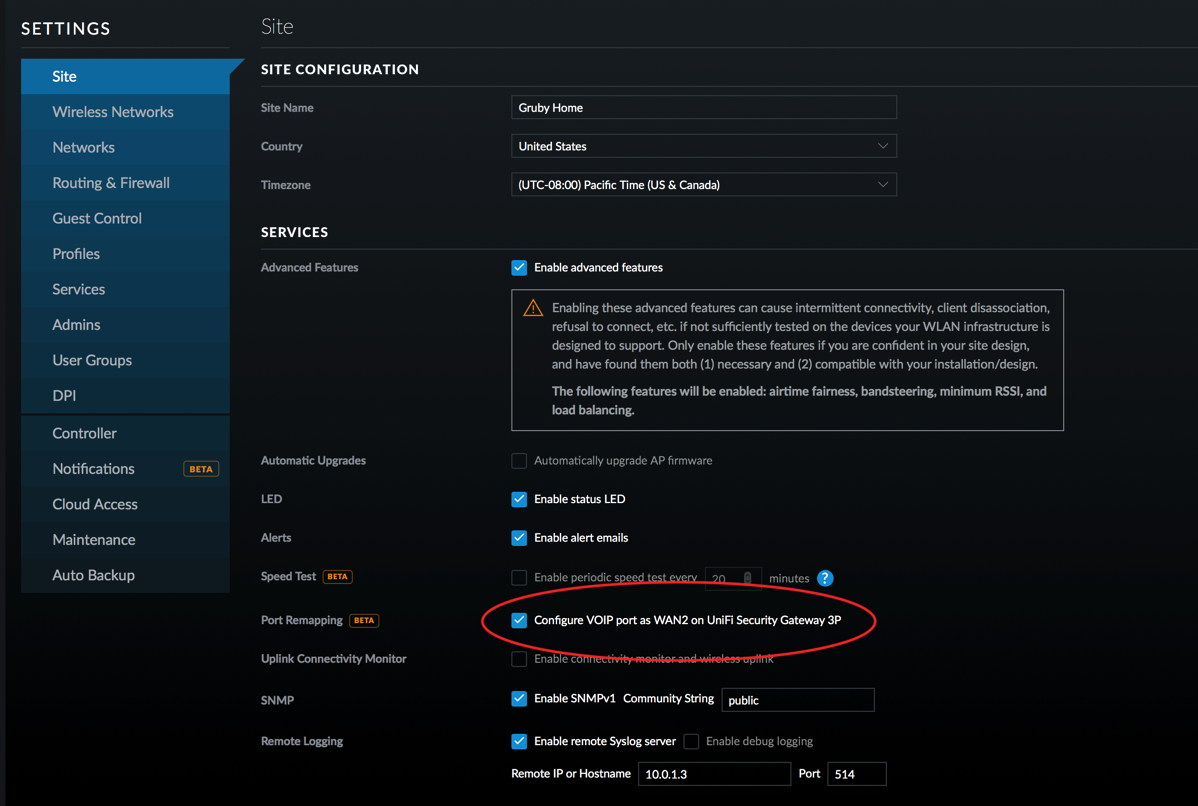
- On the UniFi Controller, setup the VOIP port to be WAN2. Wait for the USG to re-provision.
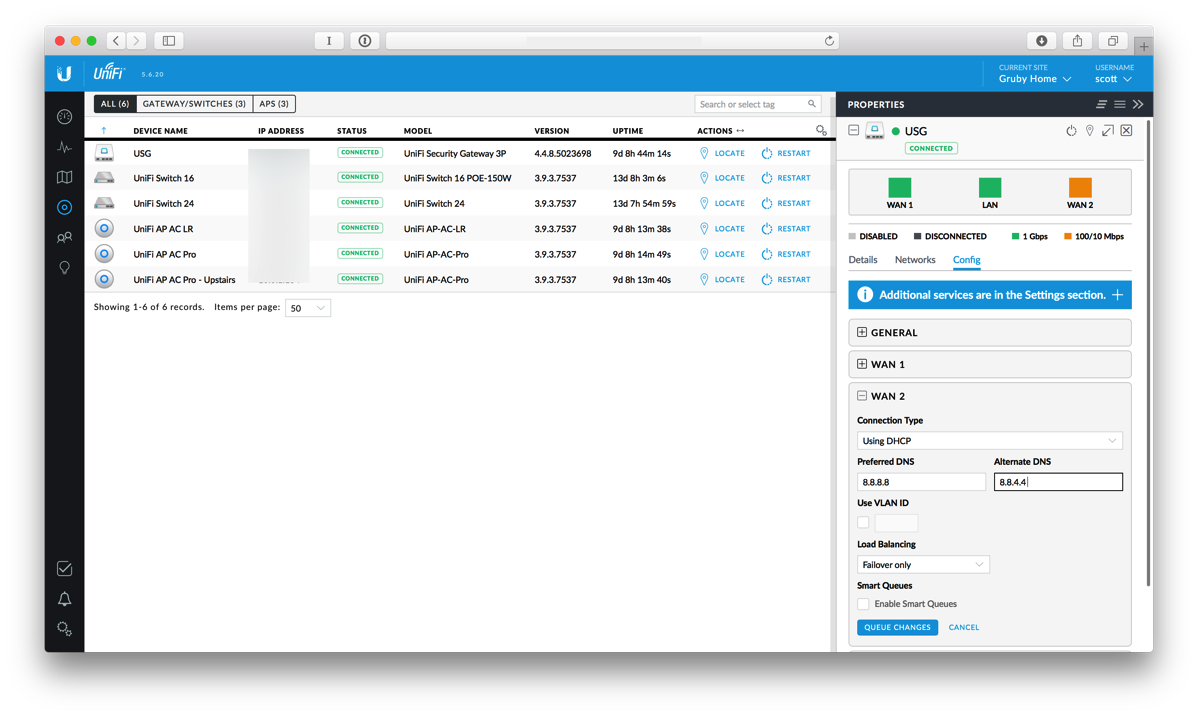
- Click on the devices icon and select the USG.
- Select WAN2 and enter DNS settings. I've used Google's DNS, 8.8.8.8 and 8.8.4.4.
- Make sure Load Balancing is set to Failover Only and then click QUEUE CHANGES. Then click APPLY CHANGES.
In order to verify that things are working, SSH into the USG using your admin username and password.
Type
show load-balance statusand you'll see something like this:Group wan_failover interface : eth0 carrier : up status : active gateway : x.x.x.x route table : 201 weight : 100% flows WAN Out : 624 WAN In : 0 Local Out : 2 -
A new diet
Several years ago I wrote that I went gluten free to help with some intestinal issues. Doing that combined with my ulcerative colitis medicine has kept me in check for awhile. Unfortunately things changed earlier this year and my colitis acted up.
When I was fighting my latest flare up, my wife suggested I look at changing my diet again. She is a great wife and did research to see what diets could help people with ulcerative colitis. She found the Specific Carbohydrate Diet and while it seemed quite restrictive, I felt like I didn't have any other choice. I started this diet about three months ago and have been quite good at closely sticking to it. The basic gist of the diet is to eliminate grains, beans, and complex sugars. Looking at my diet prior to this, I had been eating a lot of grains, beans and definitely a lot of complex sugars!
The hardest part of the diet started out being the sugars as I love sweets. I've replaced sugars with lots and lots of fruit as well as nuts. Luckily I live in San Diego and fresh fruit is pretty plentiful all year round. Going to the store is a different experience as I closely look at labels and look for things that really shouldn't exist in my food such as sugar in the Kirkland Salsa or rice in the crunchy snap peas.
One side effect that is probably pretty obvious is that I lost over 10 pounds on this diet not that I needed to do it.
People have asked me if I feel better because of the diet. I guess the diet and the medication have made me feel normal again. I've always had a lot of energy and been pretty fit so that hasn't changed. I have no plans to get off this diet as it seems to be agreeing with me. Watching what I put in my body is definitely not a bad thing and has made me more closely examine the labels for foods to see what hidden ingredients lie in our processed foods.